这是一个使用新浪云部署 Node.js 项目的实践,主要目的是为了总结一些自己部署的经验和遇到的坑,希望有参考价值。

前提

为了达到部署成功的目的,可能需要一些 Git, Node.js 经验,另外新浪云也提供了比较丰富的文档

准备

先确定一下自己的项目设置,最好是把默认端口设置成 5050,以及修改 MySQL 链接设置。下面是 app.js 的设置,注意最后一行。

var express = require('express')
var app = express()

app.listen(process.env.PORT || 5050)

下面是数据库连接 pool.js 的设置。

var mysql = require('mysql');

// 连接共享型MySQL
var connection = mysql.createConnection({
    host     : process.env.MYSQL_HOST,
    port     : process.env.MYSQL_PORT,
    user     : process.env.ACCESSKEY,
    password : process.env.SECRETKEY,
    database : 'app_' + process.env.APPNAME
});

创建应用

这一步大部分步骤都比较简单,会采用官方提供的文档描述。

登录『新浪云控制台』,点击云应用,点击『创建新应用』.
选择 NodeJS 填写二级域名和应用名称。实例个数推荐设置为 1。注意 Node.js 项目是按小时收费的。.
代码管理.
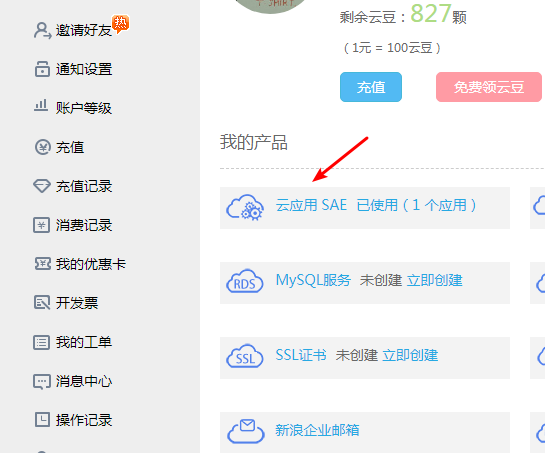
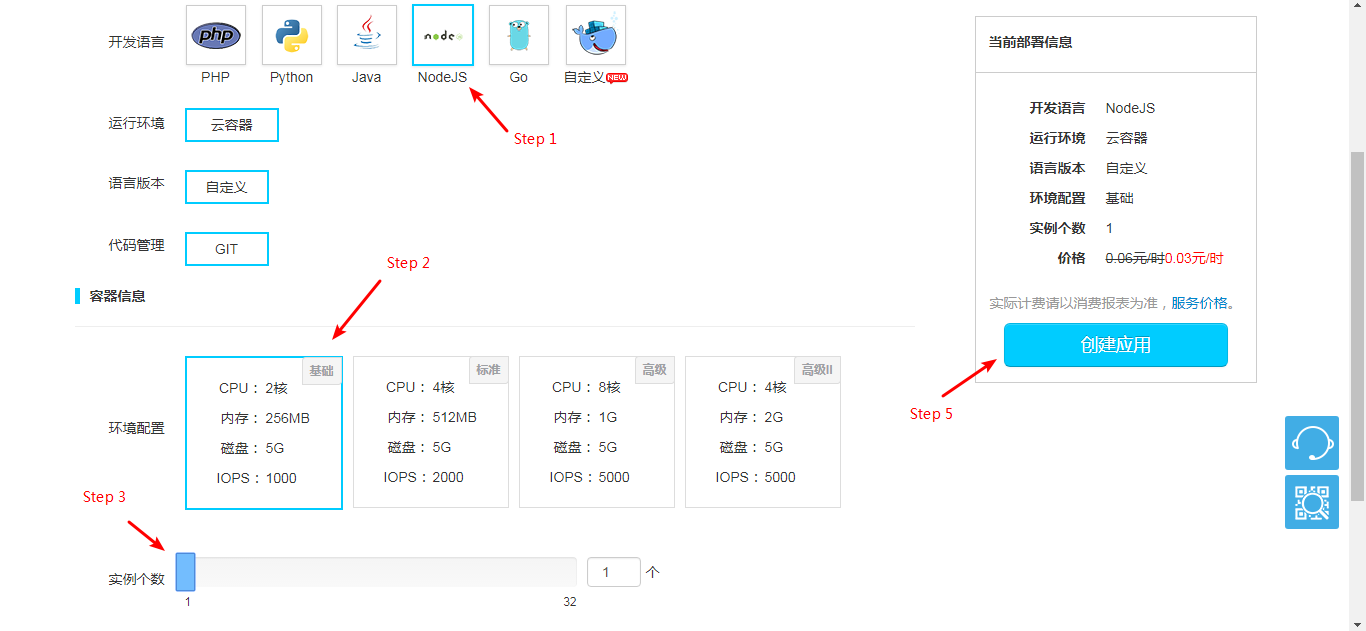
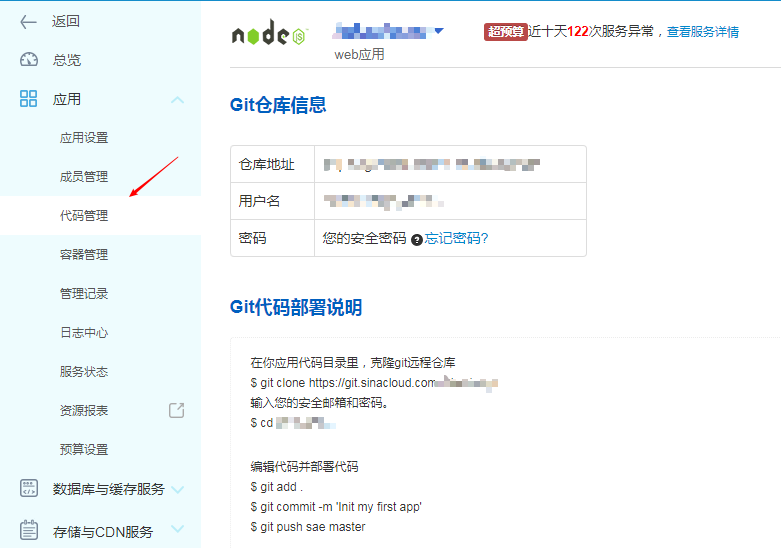
  • 创建应用完成之后点击代码管理,这里使用 Git 进行正式的项目部署。

项目部署

首先进入到自己的 Git 项目然后确保本地运行没有问题后,创建一个仓库 sinacloud。注意请将下面的所有的 yourapp 替换成你自己的应用名称。

$ git remote add sinacloud https://git.sinacloud.com/yourapp
$ git push sinacloud master

这里说一下没使用过 Git 的同学如何初始化一个 Git 项目和 commit 操作。具体的可以参考文档和 Github 帮助

# 初始化 git 项目
git init

# 如果第一次使用 git 会提示你配置全局用户名和邮箱
git config --global user.email "you@example.com"
git config --global user.name "Your Name"

# git commit 操作用于每次修改文件之后提交
git add .
git commit -m '这里填写修改的注释'

# git remote -v 确认远程仓库地址
git remote -v
# git push 用来与远程同步
git push

部署的时候,Git 会显示当前的进度,如果部署失败,会提示相应的错误信息(比如 package.json 格式问题等)。

部署完成后,就可以通过 http://yourapp.applinzi.com 来访问应用了。

参考文档

后期维护

后期维护可以采用两种方式

1.直接本地修改后部署到 sinacloud 仓库

$ git add .
$ git commit -m 'update'
$ git push sinacloud master

2.或者在你应用代码目录里,克隆 Git 远程仓库

$ git clone https://git.sinacloud.com/yourapp

输入安全邮箱和密码。

$ cd yourapp

编辑代码并部署代码

$ git add .
$ git commit -m 'Init my first app'
$ git push 

上面的代码是可以在应用管理-应用-代码管理里看得到的。
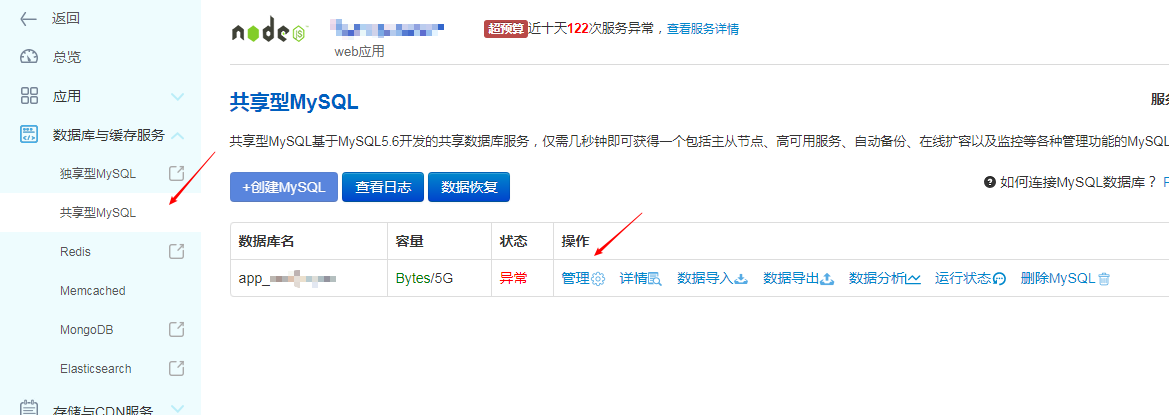
数据库

为应用添加数据库。

进入应用管理-数据库与缓存服务-共享型 MySQL, 创建 MySQL,跟着步骤一步一步创建。 创建完成之后选择管理,会跳转到类似 phpmyadmin 的网页版数据库管理工具,可以倒入数据文件或者执行 SQL 语句。

创建数据库.

数据库链接

下面是Node.js 链接 MySQL 的设置,注意数据库名的设置。

var mysql      = require('mysql');

// 连接共享型MySQL
var connection = mysql.createConnection({
    host     : process.env.MYSQL_HOST,
    port     : process.env.MYSQL_PORT,
    user     : process.env.ACCESSKEY,
    password : process.env.SECRETKEY,
    database : 'app_' + process.env.APPNAME
});

填坑

部署的时候可能遇到的问题我尝试一个个写在下面。

Unable to select a buildpack 构建镜像失败

这个是给其他人部署的时候发现的错误。其实就是项目没有带 package.json 文件, 新浪云无法识别是 Node.js 项目。带上 package.json 文件后 git add . & git commit 就可以了。

502 错误

首先在自己本地 npm start 确认项目跑的起来,确认 app.js 和 MySQL 设置无误。如果都没问题可能是粘滞会话没有打开,应用-应用设置-粘滞会话开启,我打开之后等待一会页面就能访问了,暂时不确定是不是这个设置影响的。

云豆消耗异常

注意控制台中代码空间的消耗量,项目代码保持在 100M 以下,超过 100M 是按量收费的,云豆会消耗很快。当日消耗的云豆可以在近 7 天服务消费明细查看
减少代码量有这些方法,.gitignore 中一定要加上 node_modules,如果有大量图片等静态资源文件,推荐图片压缩之后再上传。
注意 Node.js 项目是按小时收费的,每小时容器消耗 3云豆/小时,共享 MySQL 租金 2云豆/小时。也就是说一天消耗 50 云豆左右。在应用预算里也可以看到提示 『该应用使用了共享型MySQL,应用预算云豆数量不能低于日租金48云豆。』

暂停应用

在云豆预算中设置预算为 1 可以暂停应用。如果网页版设置不了,可以 App Store 下载 SAE 设置。

参考文档

Here be a sample post with a custom background image. To utilize this “feature” just add the following YAML to a post’s front matter.

image:
  background: filename.png

This little bit of YAML makes the assumption that your background image asset is in the /images folder. If you place it somewhere else or are hotlinking from the web, just include the full http(s):// URL. Either way you should have a background image that is tiled.

If you want to set a background image for the entire site just add background: filename.png to your _config.yml and BOOM — background images on every page!

Background images from Subtle Patterns (Subtle Patterns) / CC BY-SA 3.0

Syntax highlighting is a feature that displays source code, in different colors and fonts according to the category of terms. This feature facilitates writing in a structured language such as a programming language or a markup language as both structures and syntax errors are visually distinct. Highlighting does not affect the meaning of the text itself; it is intended only for human readers.

Pygments Code Blocks

To modify styling and highlight colors edit /assets/less/pygments.less and compile main.less with your favorite preprocessor. Or edit main.css if that’s your thing, the classes you want to modify all begin with .highlight.

#container {
    float: left;
    margin: 0 -240px 0 0;
    width: 100%;
}

Line numbering enabled:

1
2
3
4
5
6
7
8
<nav class="pagination" role="navigation">
    {% if page.previous %}
        <a href="{{ site.url }}{{ page.previous.url }}" class="btn" title="{{ page.previous.title }}">Previous article</a>
    {% endif %}
    {% if page.next %}
        <a href="{{ site.url }}{{ page.next.url }}" class="btn" title="{{ page.next.title }}">Next article</a>
    {% endif %}
</nav><!-- /.pagination -->
module Jekyll
  class TagIndex < Page
    def initialize(site, base, dir, tag)
      @site = site
      @base = base
      @dir = dir
      @name = 'index.html'
      self.process(@name)
      self.read_yaml(File.join(base, '_layouts'), 'tag_index.html')
      self.data['tag'] = tag
      tag_title_prefix = site.config['tag_title_prefix'] || 'Tagged: '
      tag_title_suffix = site.config['tag_title_suffix'] || '&#8211;'
      self.data['title'] = "#{tag_title_prefix}#{tag}"
      self.data['description'] = "An archive of posts tagged #{tag}."
    end
  end
end

Standard Code Block

<nav class="pagination" role="navigation">
    {% if page.previous %}
        <a href="{{ site.url }}{{ page.previous.url }}" class="btn" title="{{ page.previous.title }}">Previous article</a>
    {% endif %}
    {% if page.next %}
        <a href="{{ site.url }}{{ page.next.url }}" class="btn" title="{{ page.next.title }}">Next article</a>
    {% endif %}
</nav><!-- /.pagination -->

Fenced Code Blocks

To modify styling and highlight colors edit /assets/less/coderay.less and compile main.less with your favorite preprocessor. Or edit main.css if that’s your thing, the classes you want to modify all begin with .coderay. Line numbers and a few other things can be modified in _config.yml under coderay.

#container {
    float: left;
    margin: 0 -240px 0 0;
    width: 100%;
}
<nav class="pagination" role="navigation">
    {% if page.previous %}
        <a href="{{ site.url }}{{ page.previous.url }}" class="btn" title="{{ page.previous.title }}">Previous article</a>
    {% endif %}
    {% if page.next %}
        <a href="{{ site.url }}{{ page.next.url }}" class="btn" title="{{ page.next.title }}">Next article</a>
    {% endif %}
</nav><!-- /.pagination -->
module Jekyll
  class TagIndex < Page
    def initialize(site, base, dir, tag)
      @site = site
      @base = base
      @dir = dir
      @name = 'index.html'
      self.process(@name)
      self.read_yaml(File.join(base, '_layouts'), 'tag_index.html')
      self.data['tag'] = tag
      tag_title_prefix = site.config['tag_title_prefix'] || 'Tagged: '
      tag_title_suffix = site.config['tag_title_suffix'] || '&#8211;'
      self.data['title'] = "#{tag_title_prefix}#{tag}"
      self.data['description'] = "An archive of posts tagged #{tag}."
    end
  end
end

GitHub Gist Embed

An example of a Gist embed below.

Sample Link Post

This theme supports link posts, made famous by John Gruber. To use, just add link: http://url-you-want-linked to the post’s YAML front matter and you’re done.

Video embeds are responsive and scale with the width of the main content block with the help of FitVids.

Not sure if this only effects Kramdown or if it’s an issue with Markdown in general. But adding YouTube video embeds causes errors when building your Jekyll site. To fix add a space between the <iframe> tags and remove allowfullscreen. Example below:

<iframe width="560" height="315" src="//www.youtube.com/embed/SU3kYxJmWuQ" frameborder="0"> </iframe>